Creative Treasure Chest Cake
by Sugar Mama (Shawndra)
(Orlando, FL)
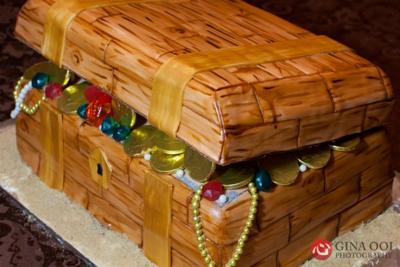
This treasure chest cake was so much fun!
I started by baking 3 layers of 9X13 cakes. And cooled.
I froze one of the layers for a few hours, this will be the lid, it's easier to carve when frozen.
The other 2 layers I filled and stacked and covered with fondant tinted a light brown color.
I took a tool with a point on the end from my Wilton took kit (almost like a toothpick end but smoother) and used a ruler to indent horizontal lines in cake to look like wood slats. Using the same tool I made vertical lines between to make the slats look like slats side by side.
I then used the small wheel tool (like a mini pizza cutter) to make lines in the slats, in the middle and side of each slat, to look like cracks in the wood.
I took brown fondant dye and mixed with a very little amount of vodka. So that it is still very dark brown. I painted this onto those cracks, and made some circles to look like knots in the wood. Let this dry completely.
Then, take the brown dye and mix with vodka again, only more vodka so it's a clear brown color. I took a wide paint brush and just brushed it on, vertically, over the whole cake giving it the wooden texture.
Next I took my frozen layer, placed on a cake board, the exact
I did the same steps as above to make it look like wood.
I used 5 dowells to hold the lid open. I cut 3 about 2.5 inches taller than the bottom cake, then place the lid on and measured how long for the other 2, spacing them about 1.5 inches behind the 3 dowells, so they'll be shorter.
I took Royal icing, dyed light brown, and used that as glue to glue the back of the lid to the back of the chest and rested the lid on those dowels.
Then I added the brackets and keyhole using white fondant. I painted it gold with an edible gold paint found at my local cake supply store.
After that was completely dried for a few hours I added the treasure! Be creative with it. I used ringpops, fruit gushers to look like gems, disco dust, and white dragees and silver dragees put on individually to look like necklaces hanging over the sides. I wish I would have make some sugar gems but didn't think of it. I also bought some gold chocolate coins from the dollar store.
I had a photographer friend take pictures for me, because it turned out so great! I was in love with the finished product!
Comments for Creative Treasure Chest Cake
|
||
|
||
|
||
|
||
|
||
|
Click here to add your own comments Return to February 2012 Cake Decorating Contest Submission Form. |
Must See Pages for this Month!
- Most Amazing Cakes Gallery
- Seasonal Cakes
- Unique Cakes
- Kids Cakes And Don't Forget...
- Our Home Page - Start Here!

