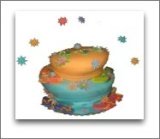
Daisy Daisy Wedding Cupcake
by Yasmeen Shariff
(Malaysia)


Daisy Daisy Wedding Cupcake
Chocolate Butter cake
5 oz (150g) Butter - softened
5 oz (150g) fine(castor) sugar
6 oz (175g)self-raising flour
3 eggs
2 tablespoons cocoa / chocolate powder
1 tsp vanilla essence
2 tbsp milk (for more moist cupcakes)
Method 1.
1. Pre-heat the oven to 350 degrees F (180 degrees C).
2. Line a 12 cup cake / muffin pan, with paper cup cake cases.
3. Crack the eggs into a cup and beat lightly with a fork.
4. Place all the ingredients in a large bowl.
5. Beat with an electric mixer for 2 minutes, until light and creamy.
6. Divide the mixture evenly between the cake cases. (about 2/3 full)(Alternatively, bake the cake in a 9" x 9" x 2" (height) square cake tin,
Bake as normal, when baked cool the cake, then chill it in the fridge.
Before using a 2 inch diameter round cookie / cake cutter to cut out cakes from this square cake.
7. Bake for 18-20 minutes until risen and firm / springy to touch or when a tooth pick inserted into cake comes out clean.
8. Allow to cool for a few minutes and then transfer to a wire rack.
9. Allow to cool fully before icing.
Decoration for cakes.
Ready to roll Fondant (I used Wilton Brand)
Colors Blue, yellow (optional)
Some inch broad skin ribbon in darker blue or purple for cake sides.
1 tablespoon Semolina colored in yellow for the stamen
Some tooth picks
Fondant flower cutters for Daisy design
Some ready prepared Royal Icing in plain white.
A little water and a painting brush
Some Icing sugar for dusting purposes.
Rolling pin
Disposable piping bag fitted with a small writing nozzle.
Sugar beads in Silver
Apricot jam for brushing on the cake.
Small round cake board (you and make it yourself , cut out a 2 inch diameter piece of cardboard, cover it with foil and then turn it over and cover the other side with a cute paper cake dolly, securing it with small dabs of royal icing. Leave to dry.
To assemble / decorate the cake.
1. Beat the Apricot jam with a fork to blend it evenly.
2. Take ready to roll Fondant, the size of a golf ball, color it light blue hue using the Blue paste color, (use a tooth pick to add color to the ball of Fondant, a little bit at a time until you get the desired color). You may need to dust it with a little icing sugar if it becomes too soft or sticky) then flatten the ball of Fondant a little and roll it out on a plastic sheet dusted lightly with icing sugar into a round. Cover it with another plastic sheet, while you prepare the cake that needs to be covered.
3. Brush the cake top and sides with Apricot Jam, then place the cake onto the work top surface and taking the rolled fondant carefully onto the rolling pin, place it over the cake top and work quickly to cover the cake top and sides. Using the palm of your hand to hold the sides
4. Using some white fondant, roll out to about 1/8 inch thickness, using a Daisy flower cutter, cut out daisy petals (2 sets of petals for each flower) You would need 3 Daisy flowers for each cake top, use the balling tool to make a depression in the centre of 1 set of the petals, lightly brush with some water, then place another set of petals in the centre and press to stick on the 2nd set of petals at an angle to resemble the daisy flower. Taking a small pea sized ball of fondant, brush it with some water, then roll it in the yellow colored semolina to form the Centre of the daisy. (You may also color a little Fondant in Yellow and roll a pea size ball and use this as the centre for the Daisy). Brush the centre of the Daisy flower lightly with some water and press this yellow centre firmly, leave to set. Prepare a few more Daisy flowers in the same manner.
5. Make the top of the Fondant covered cake into equal sections lightly with a tooth pick. Then using white Royal Icing in a disposable icing bag fitted with a small writing nozzle ( or use parchment paper triangles to form into icing bags, fill with Royal Icing ) pipe 2 rows of drop strings to cover sides of the cake. Allow the 2nd drop string row to fall lower onto the cake sides. Make small dots on the top of the cake where the drop strings start and end, and top up with a silver sugar ball.
6. Now to cover and make the bottom of the cake decorative, lightly dot the bottom sides of the cake with some royal icing, the cover the bottom with the silk ribbon, neatly covering the edges and the ends overlapping with a dab of royal icing.
7. Finally, brush top lightly with some water using the brush, neatly arrange the Daisy flowers on the top of the cake. Firmly press into place and leave to set. (You would need 3 complete Daisy flowers for each cake top).
I prepared this for a close friend's wedding. These were one of the Gifts from the Bride to her Groom . It is customary and a Malay tradition in Malaysia, for the Bride and Groom to exchange gifts, which are decorated attractively on trays and presented to each other on the Wedding day. It is known as "Hantaran" / Gifts.
Comments for Daisy Daisy Wedding Cupcake
|
||
|
||
Must See Pages for this Month!
- Most Amazing Cakes Gallery
- Seasonal Cakes
- Unique Cakes
- Kids Cakes And Don't Forget...
- Our Home Page - Start Here!