Dora Castle Cake
by Nanacakes by design
(Scarborough, Maine)
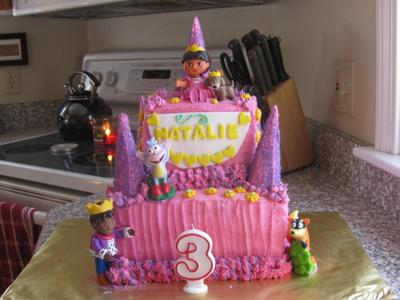
DORA CASTLE CAKE
Supplies: 2-10 inch and 2-6 inch cake pans ~ 5 Sugar Cones~ Star tips #16 or #21 ~ Piping bag ~ Dowels~ 10 inch and 6 inch cardboard cake rounds ~ small metal spatula ~ colored sugar ~ waxed paper ~ 8 oz. Fondant ~ alphabet fondant cutters ~ Heart fondant cutter ~ Dora The Explorer figurines.
CASTLE:
I made chocolate cake for the bottom layers and vanilla for the top layers. The bottom pans are 10 inch square and the top 6 inch squares, (two -2 inch layers each). If you need a bigger cake, you can increase the size of the pans and the height of the layers. Bake your cakes as usual and let cool.
Level the tops if needed (I use Even bake strips so the cakes come out level). Place cakes on a cardboard circle the same size as the cake. Start by stacking the bottom with frosting in the middle and then crumb coat and put in refrigerator. Repeat with top layer.
Frost both stacked cakes with Hot Pink Frosting and use your small metal spatula to do the stripping on the sides.
DECORATIONS:
I used 5 sugar ice cream cones for the Turrets. Frost each one with a thick pink buttercream or royal icing and sprinkle with purple sugar or you could reverse it and do purple icing with pink sugar. Let Dry on wax paper uncovered.
The little yellow flowers are #16 or #21
Roll out a small amount of white Fondant and cut the U-shaped banner to fit the top layer. Roll out a small amount of yellow fondant and cut out the name and hearts. Set aside covered with plastic wrap. If you prefer, you could decorate with frosting here and not use the fondant.
ASSEMBLE:
Determine where the top layer will be placed and place 4 dowel marks for support. Sharpen the dowel with pencil sharpener and stick in your cake marking and draw a line that is just above the top of the cake and pull out. Just below that line, cut your dowel to sit even with the cake and stick it in. Repeat with the other three dowels.
Set the top layer on the bottom layer and use the fifth sharpened dowel and go right through the middle of both layers. Tap it with a hammer and it will go easily through the cardboard circle the top layer is on.
Place pink icing in one side of piping bag and purple icing on the other side with a #16 or #21 star tip and pipe stars around the bottom of cake. Place the turret cones on the four corners and pipe around them. Pipe the bottom of the top layer with the same frosting.
Place your figures on the cake and place the last turret cone behind Dora and pipe some stars in the corners. Place your yellow flowers around and a candle in front with some of the royal icing.
Return to August 2011 Cake Decorating Contest Submission Form.
Must See Pages for this Month!
- Most Amazing Cakes Gallery
- Seasonal Cakes
- Unique Cakes
- Kids Cakes And Don't Forget...
- Our Home Page - Start Here!

