Photo Album Cake
by Terri Gilson
(Calgary, AB, Canada)
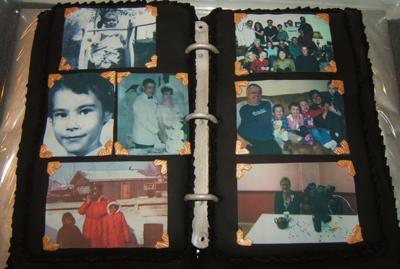
Share a life story in photos with an old fashioned photo album cake! I made this cake for my Mom's 60th birthday/retirement. The photos depict each stage of her life: infancy, childhood, early adulthood, parenthood with young kids, parenthood with adult kids, grandparenthood and retirement.
To make: Place 2 9X13 cakes side by side. Carve long outside edges of cake at a downward angle (to make it look more book-like), then cover with black fondant. For center and metal rings, mix about ½ lb. white fondant with 2-3 Tbsp of tylose or gumtex.
Roll out fondant and cut a strip about 1½ inches wide with fondant ribbon cutter and round off the ends with small circular fondant cutter. Poke a hole in each end of a large wooden skewer.
Cut 2 small circles with round fondant cutter and poke a hole in the center of each one with skewer. Place each circle over the poked out hole at each end. Make 3 round indents with skewer in between (as shown).
Evenly roll a long, thin snake of fondant, cut in 3 and form half circles, ensuring they are long and there's extra to work with (they can be trimmed later).
Cut 12 squares with small fondant square cutter and cut each of those in half. Take the corner of the square fondant cutter and cut a “V” into the middle of each half square. Make about 5 line indents in each ‘photo corner’ with the dull side of a butter knife. Dry all fondant pieces overnight on parchment paper.
When dry, spray the center strip and rings with edible silver spray and the corners with edible gold (available at hobby/craft stores) and allow an hour or so to dry.
Neatly place all six or seven edible photos on cake (these can be made at the grocery store) and place the dried silver center piece between the cakes. Make ‘glue’ with ¼ tsp. tylose with 1 Tbsp water and ‘glue’ on corners with paintbrush.
In super black buttercream, pipe borders around metal strip and 'pages' with #16 tip. Paint a little glue on half rings and gently push each end evenly into cake. Pipe outside bottom border with #18 tip.
Return to April 2012 Cake Decorating Contest Submission Form.
Must See Pages for this Month!
- Most Amazing Cakes Gallery
- Seasonal Cakes
- Unique Cakes
- Kids Cakes And Don't Forget...
- Our Home Page - Start Here!

