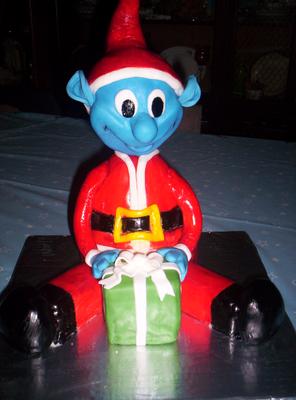
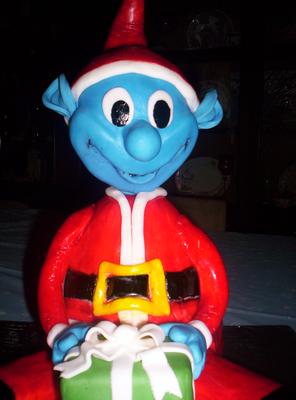
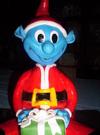
Smurf's Christmas
by Alda Cota
(Hamilton, Ontario, Canada)


|

|


|

|
To prepare the Smurf Christmas Cake:
I have found that butter cream icing is great for cakes that have many layers and need to be cut into a desired shape. You can make butter cream frosting well in advance. It will last for several days, just make sure to whip it before you us it.
I made the head by putting a skewer threw a Styrofoam ball and coating it with blue colored fondant, hand painted the eyes on the face and shaped the mouth, added the hat and ears. This is good to make a day or two ahead; to let the fondant set and dry a little. This makes it easier to handle when you’re placing it on the cake.
The feet were made by cutting a small Styrofoam ball and cutting it in half and shaping them into form that you want. Cover them in black fondant and set aside to set and dry.
When placing the head on the cake; I pushed the skewer threw the top of the cake, being careful not to damage anything.
I made my own fondant. I prefer to make my own Marshmallow fondant; I find that it tastes a lot better.
The Fondant may be made up to 2 days ahead. It may last longer if you store it in a cool place. I usually make a big batch and cut it up and mix the colors in, I find that the paste is better then the liquid.
I find that if you wrap up the fondant and place it in a zip lock bag and put it in a cool place; it will last a long time.
For the cake I used basic pound cake recipe. To make it more festive I split the batter into several bowls and added different food coloring to each bowl (red,
You will need to bake 1 long loaf pan (for the gift and the legs), two 9" in a metal bowl and one in a 6 inch round metal bowl. You must be careful and keep a close eye on the bowls while they are cooking and adjust the temperatures as they will cook differently then the loaf pan.
Once cakes are cooled I cut the bowl shaped ones into 3 pieces each and trimmed them. With the loaf; I cut a square piece off for the present and cut the rest of the loaf down the middle long ways the make the legs.
Also I slice the square cake into 3 and slice the long ones in half to frost. I frosted the layers with the butter cream frosting and stacked them I then chilled them overnight.
I trimmed the cake and shaped it into bodice, dirty iced it (to coat with a thin layer of butter cream icing. Then refrigerate again.
I attached the legs to the bodice and covered it with the rolled marshmallow fondant that I had prepared. Once the bodice is covered I then covered the square cake (gift) with the green fondant and added ribbons and a bow. Then I placed the gift box on the board between the legs.
At this point I attached the white trim on the coat followed by the belt. I attached them using a bit of water that I brushed onto the places were I wanted to attach the items. I then attached the arms and blue hands making sure that they reached the gift.
Attached the feet by brushing a bit of water on the base of the legs and attach the feet.
Next I attached the head by pushing the skewer threw the top of the cake.
Return to December, 2012 Cake Decorating Contest Submission Form.
Must See Pages for this Month!
- Most Amazing Cakes Gallery
- Seasonal Cakes
- Unique Cakes
- Kids Cakes And Don't Forget...
- Our Home Page - Start Here!